How to Adjust Your Bike’s Gear Shifting: A Step-by-Step Guide
If you’re an avid cyclist like me, you understand how important smooth gear shifting is to an enjoyable ride. Whether you're commuting through the city or tackling mountain trails, a properly adjusted gear system can make all the difference in your cycling experience. Over the years, I’ve learned that knowing how to adjust your bike’s gear shifting is an essential skill that every cyclist should master. In this article, I’ll guide you through the process of adjusting your bike’s gears, share common troubleshooting tips, and provide insights into how to keep your bike in top shape for the long haul.
Conte's Bike Shop
3449 Wilson Blvd, Arlington, VA 22201, USA
1. Understanding Your Bike’s Gear System
Before diving into the adjustments, it’s important to understand how your bike’s gear system works. Most modern bikes come with a derailleur system, which consists of front and rear derailleurs, shifters, and cogs. The derailleurs are responsible for moving the chain between the cogs, which allows you to change gears. Your bike’s shifters control the movement of the derailleurs, making it easy to shift into higher or lower gears depending on the terrain.
Understanding this system will help you identify the source of any shifting issues, making the adjustment process smoother. Common problems like skipping gears, noisy shifting, or chain dropping often indicate issues with the derailleur alignment or tension.

Bicycle Barn LLC
839 Reading Rd, East Earl, PA 17519, USA
2. Tools You'll Need for the Job
Adjusting your bike’s gear shifting doesn’t require many tools, but there are a few essentials you’ll need to get the job done properly:
- 2mm or 3mm Allen wrench: This is used to make adjustments to the derailleur and shifter settings.
- Flathead screwdriver: Essential for adjusting the tension on the derailleur cables and fine-tuning the barrel adjusters.
- Bike stand (optional but helpful): Using a bike stand allows you to work more comfortably and ensures the bike is stable while adjusting the gears.
- Cable lubricator (optional): If your cables are old or stiff, lubricating them can make the adjustment process smoother.
These basic tools will be enough to adjust the gears on most bikes. Once you have your tools ready, we can start with the adjustments.
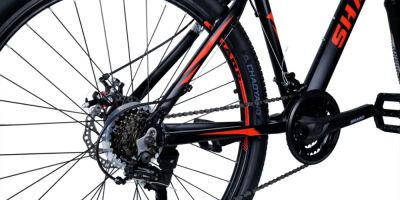
3. Adjusting the Rear Derailleur
The rear derailleur is where most of the adjustments are made. If you notice your bike skipping gears or the chain not shifting smoothly, the rear derailleur is likely the culprit. Here’s how to make the necessary adjustments:
- Check the derailleur hanger: Make sure the derailleur hanger is not bent, as this can cause the derailleur to misalign with the cogs. If it is bent, it may need to be replaced or straightened by a bike mechanic.
- Adjust the limit screws: There are two limit screws (one for the high gear and one for the low gear) located on the rear derailleur. These screws control how far the derailleur moves when shifting to the highest and lowest gears. Turn these screws to make sure the derailleur doesn’t overshoot the cogs, preventing the chain from falling off.
- Fine-tune with the barrel adjuster: The barrel adjuster, usually found near the shifter or derailleur, helps you adjust the tension of the derailleur cable. If your gears are skipping or not shifting cleanly, turn the barrel adjuster counterclockwise to loosen the tension or clockwise to tighten it.
These adjustments should improve the shifting on your rear derailleur, making the gear changes smoother and more accurate.
4. Adjusting the Front Derailleur
The front derailleur is responsible for shifting the chain between the large and small chainrings. While it’s often less frequently adjusted than the rear derailleur, it’s equally important for smooth gear shifting. To adjust the front derailleur:
- Check the alignment: Ensure the front derailleur is aligned properly with the chainrings. The derailleur should be positioned slightly above the largest chainring and parallel to it.
- Adjust the limit screws: Just like the rear derailleur, the front derailleur has limit screws to ensure the derailleur doesn’t shift too far inward or outward. Adjust the screws to prevent the chain from dropping off the chainrings.
- Fine-tune with the barrel adjuster: Use the barrel adjuster on the front derailleur to tweak the cable tension. If the chain struggles to shift onto the larger chainring, tighten the tension; if it’s having trouble shifting down to the smaller chainring, loosen the tension.
After making these adjustments, test the front derailleur by shifting through the gears to ensure smooth and accurate transitions.
5. Common Gear Shifting Problems and How to Fix Them
Even with proper adjustments, there are common issues that can arise with bike gear shifting. Here are some of the most frequent problems and how to address them:
- Skipping gears: If your bike skips gears, it’s usually a sign that the derailleur cable tension is off. Adjust the barrel adjuster to correct the tension.
- Chain dropping: If the chain falls off while shifting, this could be due to a misaligned derailleur or incorrect limit screw settings. Double-check the derailleur alignment and adjust the limit screws.
- Difficulty shifting into higher or lower gears: This can be caused by either too much or too little cable tension. Use the barrel adjuster to fine-tune the tension until the shifting is smooth.
By addressing these issues, you’ll keep your bike’s gears shifting smoothly for a better overall riding experience.
6. When to Seek Professional Help
While adjusting your bike’s gear shifting is a relatively simple process, there are times when you may need professional help. If you’ve tried adjusting the derailleurs yourself and still experience issues, it might be time to take your bike to a local shop for a thorough inspection. Problems like a bent derailleur hanger, worn-out cables, or damaged cogs may require expert attention.
If you’re unsure or simply prefer to have a professional handle it, don’t hesitate to visit your local bike shop. Regular maintenance by a professional mechanic can help ensure your bike remains in top condition for years to come.