Finding the Perfect Mountain Bike Frame Size for Optimal Comfort and Performance
When I first started mountain biking, choosing the right bike frame was one of the most confusing aspects. I remember standing in a bike shop, overwhelmed by all the options, unsure of how to choose the best frame for my needs. It wasn’t until I learned how crucial the right frame size is that I truly began to enjoy my biking experience. A proper fit enhances comfort, reduces injury risks, and significantly improves overall performance. In this article, I’ll walk you through my personal journey and give you detailed steps on how to find the right mountain bike frame size for your riding style and body type.
Conte's Bike Shop
3449 Wilson Blvd, Arlington, VA 22201, USA
1. Why Frame Size Matters
The size of your mountain bike frame is critical because it affects your posture, handling, and comfort on the trails. Choosing the wrong size can lead to back pain, discomfort during rides, or even worse, injuries. I vividly remember my first bike, which was too big for me. It was difficult to control, and I often found myself uncomfortable, especially after long rides. Once I switched to a frame that was the right size for me, my biking experience improved dramatically. Here's why it matters:
- Comfort: A bike that fits properly allows you to ride for longer periods without discomfort. With the right size frame, your body is better aligned, and the ride feels natural.
- Handling: A properly sized frame provides better control, especially on technical trails. I noticed a significant difference in my handling when I switched to the right size.
- Efficiency: A good fit allows you to pedal more efficiently and use less energy, making your ride smoother and faster.
- Injury Prevention: The wrong frame size can strain your muscles and joints, leading to aches and potential injuries. Finding the right frame helps reduce these risks.
2. Understanding Bike Frame Geometry
Mountain bike frames come in various geometries, and each design serves a different purpose. Over time, I’ve come to appreciate how the geometry affects my riding style. Here’s a breakdown of key components:
- Top Tube Length: This is the horizontal distance between the seat tube and the head tube. A longer top tube provides more reach, making it ideal for longer riders or those looking for a more aggressive riding posture. A shorter top tube makes the bike more compact and better for quick, nimble movements.
- Seat Tube Length: This is the length of the tube that holds the seat post. It’s essential to match the seat tube length to your leg length, ensuring your saddle is positioned properly. I learned the hard way that a saddle that’s too low can cause knee pain during longer rides.
- Head Tube Angle: The angle of the head tube impacts the handling of the bike. A slacker head tube angle (less steep) offers more stability at high speeds and on downhill sections. A steeper head tube angle allows for quicker handling, making it suitable for technical terrain.
Understanding these components will help you make more informed decisions when selecting the right frame. It’s not just about the size; it’s also about the geometry that best suits your riding style.

Bicycle Barn LLC
839 Reading Rd, East Earl, PA 17519, USA
3. How to Measure Your Body for the Right Frame Size
To find the right frame size, you need to take a few key measurements. It might sound intimidating at first, but I found it pretty straightforward once I got the hang of it. Here’s how to do it:
- Inseam Measurement: Stand with your feet about 6 inches apart, and measure the length from your crotch to the floor. This is your inseam. It’s a key factor in determining the correct seat tube length. I used to underestimate the importance of this, but getting the right inseam measurement was a game-changer.
- Height: While inseam is critical, your overall height also plays a role in determining frame size. Generally, taller riders need a larger frame, but this isn’t always the case, as leg length and torso length can vary significantly.
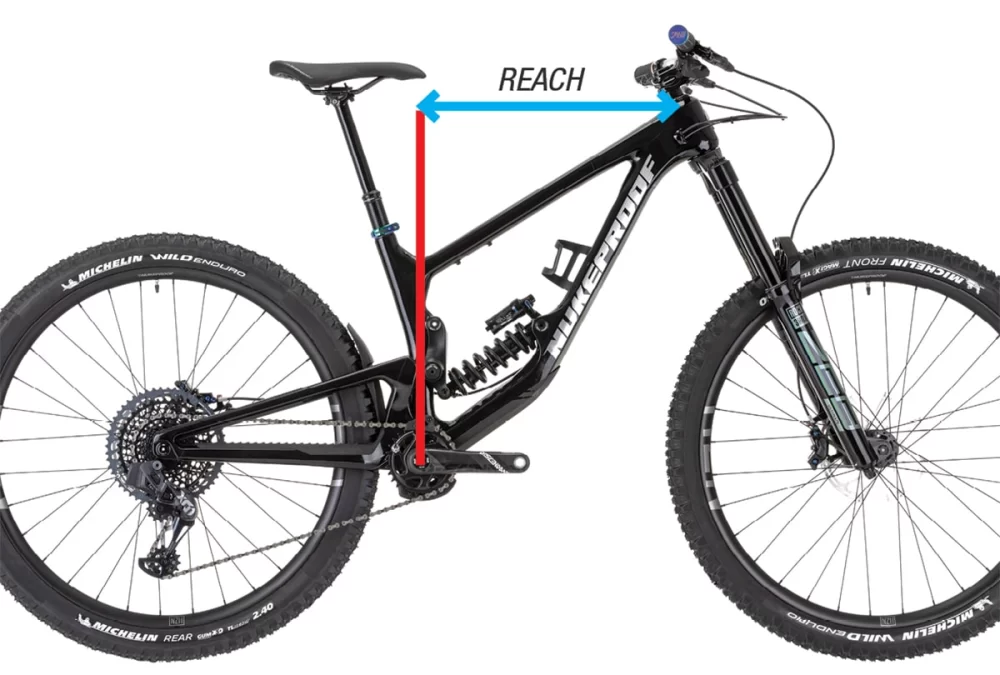
- Arm Length and Reach: Reach is the distance from the seat to the handlebars, and it’s vital for comfort and control. I learned that longer arms often require a slightly larger frame or a frame with a longer top tube for a comfortable riding position.
4. How to Use Size Charts and Manufacturer Guidelines
Once I gathered my measurements, the next step was to consult size charts provided by bike manufacturers. Different brands have slightly different sizing systems, so it’s important to refer to the specific chart for the bike you're considering. Here’s how I used the size charts to find my perfect frame:
- Refer to the Chart: Most bike brands will provide a chart that lists frame sizes (e.g., Small, Medium, Large) along with corresponding height and inseam ranges. For example, a medium frame might be suitable for someone between 5'6" and 5'10".
- Consider the Geometry: I always cross-checked the size chart with the geometry of the bike I was interested in. For instance, if I wanted a more aggressive ride, I would choose a frame with a slacker head tube angle, even if the chart suggested I go with a medium.
- Test Ride: Once I narrowed it down to a size, I made sure to test ride the bike. This is crucial! The bike should feel comfortable, and you should be able to adjust the saddle and handlebars to achieve your ideal position.
5. Fine-Tuning the Fit
After selecting the right frame size, the next step is to make small adjustments for the perfect fit. These are the steps I took to fine-tune my mountain bike:
- Adjust the Saddle: The saddle height and position are critical for comfort and pedaling efficiency. I adjust my saddle height to ensure my knee is slightly bent at the bottom of each pedal stroke.
- Handlebar Height and Reach: I also tweak the height and reach of the handlebars to ensure I have a comfortable and natural riding position. A higher handlebar can reduce strain on your back, while a lower handlebar allows for a more aggressive posture.
- Pedal Position: If you’re riding for extended periods, adjusting the pedals is also important. I find that slightly adjusting my pedal position helps prevent knee discomfort during long rides.
Fine-tuning your bike’s fit may take a few tries, but once it’s dialed in, you’ll experience a more comfortable and efficient ride.
6. The Right Frame Size for Different Riding Styles
Different riding styles also influence the type of frame size that works best for you. Here’s a quick guide based on what type of mountain biking you do:
- Cross-Country: For long, smooth rides, I prefer a more upright position, which typically means a medium-sized frame with a slightly shorter top tube.
- Trail Riding: For aggressive trail riding, I choose a slightly larger frame with a longer top tube for better control over technical terrain.
- Downhill: For downhill, a larger frame with slacker geometry offers the stability I need at high speeds and on steep descents.
Each of these styles requires a frame that matches not only your body size but also your riding goals. Make sure to choose wisely based on your personal preferences and needs.