
Mastering the Art of Fixing Your Bike Chain: A Step-by-Step Guide
If you're like me, cycling is more than just a mode of transport—it's a passion, a lifestyle, and an escape from the daily grind. Over the years, I’ve encountered my fair share of bike maintenance issues, but one that’s always a potential headache is the dreaded bike chain problem. Whether it’s snapping, slipping, or just not working as smoothly as it should, a bike chain issue can quickly derail your ride. But don't worry—after a few experiences of dealing with chain mishaps, I've learned that fixing your bike chain isn't as difficult as it seems. In fact, it’s a skill every cyclist should have in their toolkit. In this article, I’ll guide you through everything you need to know about fixing your bike chain, from diagnosing common issues to making the repair yourself, saving both time and money.
Conte's Bike Shop
3449 Wilson Blvd, Arlington, VA 22201, USA
Common Bike Chain Problems You Might Encounter
Before jumping into the repairs, it's important to understand the types of issues that can occur with your bike chain. Knowing what to look for can help you identify the problem quickly and take the right steps to fix it. Based on my experiences, here are the most common bike chain problems you might face:

Bicycle Barn LLC
839 Reading Rd, East Earl, PA 17519, USA
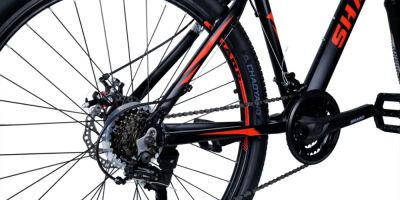
1. Chain Slipping
One of the most frustrating issues I’ve encountered is chain slipping. This happens when the chain momentarily skips over the gears, often causing a jerky ride. It’s usually a sign that the chain is either too stretched or there’s a problem with the derailleur. I’ve experienced this during intense climbs or while shifting gears under pressure, and it can make for a very frustrating ride. Fortunately, it's often an easy fix with the right tools.
2. Broken or Snapped Chain
A snapped chain is one of the most common and potentially dangerous issues. It can happen unexpectedly, often when you’re applying a lot of pressure on the pedals. I remember one ride where I was powering through a steep hill, and suddenly, the chain snapped. It was a major setback and completely derailed my adventure. A broken chain means you’ll need to replace or repair the broken link—an easy fix if you have the right equipment on hand.
3. Chain Squeaking or Noisy Chain
Chain squeaks are another common issue, and while they might not stop you from riding, they can be annoying. Squeaking usually means the chain needs lubrication or there might be dirt or grime affecting the movement. I’ve found that keeping my chain clean and lubed helps prevent the squeaking and ensures a smoother ride.
4. Stiff Links
Another problem I’ve faced on occasion is stiff chain links. This happens when a link in the chain becomes stuck and doesn’t move freely. Stiff links can cause the bike to shift poorly and make riding uncomfortable. I’ve found that cleaning the chain and lubricating it can sometimes solve the problem, but if the link remains stiff, it might need to be replaced or removed.
Tools You’ll Need to Fix Your Bike Chain
Before diving into the repair process, you’ll need to gather a few essential tools. Having these tools on hand will make the repair process quicker and more efficient. Here’s what I always keep in my bike repair kit for chain fixes:
1. Chain Tool
A chain tool is a must-have for any cyclist. This tool is designed to push the pins out of your chain, allowing you to remove or replace damaged links. I remember when I first started cycling, I didn’t have a chain tool, and I quickly realized how essential it was after my first broken chain. It’s inexpensive, compact, and easy to use once you get the hang of it.
2. Replacement Chain Links or Chain
If you’re dealing with a broken chain, having a few spare chain links or even a full chain replacement can save you in a pinch. I always carry a spare quick link, as it allows for quick repairs on the go. If the chain is too damaged, though, a full replacement might be necessary.
3. Lubricant
A good-quality chain lubricant will ensure that your chain runs smoothly and helps reduce wear over time. I always make sure my chain is well-lubed before long rides, as it reduces friction and helps prevent squeaks and stiffness. Keep in mind, too much lubricant can attract dirt, so a light application is best.
4. Cleaning Supplies
When it comes to maintaining your bike chain, keeping it clean is half the battle. Dirt and grime can cause chains to skip, squeak, and wear out prematurely. I’ve found that using a chain cleaning brush and degreaser helps remove built-up dirt, making my chain run like new.
Step-by-Step Guide to Fixing Your Bike Chain
Now that you have the necessary tools, let’s dive into how to fix your bike chain. The following steps cover everything from dealing with chain slips to replacing a broken chain link. I’ve walked through these steps multiple times and can confidently say that once you get the hang of it, fixing a chain is a straightforward process.
Step 1: Identify the Problem
First, take a moment to assess the chain issue. Is it slipping, broken, or simply making noise? If it’s slipping or making noise, it could be a lubrication or tension issue. If it’s broken, you’ll need to remove the damaged link and either replace it or shorten the chain. Understanding the issue will determine the repair method.
Step 2: Use the Chain Tool to Remove the Broken Link
If the chain is broken, you’ll need to remove the damaged link. Place the chain into the chain tool and align the pin with the tool’s punch. Using the tool, push the pin out of the chain to remove the broken link. It may take a little effort, but with the right positioning, the pin should come out easily. I once had to remove several links after a long, rough ride, and having a reliable chain tool made the process much smoother.
Step 3: Reinstall the Chain or Replace the Link
Once the broken link is removed, it’s time to reconnect the chain. You can either use a quick link to join the two ends of the chain or install a new chain link using the chain tool. Make sure the links are properly aligned and the pin is securely in place. I’ve found that quick links are the most convenient, as they allow for easy installation and removal without any tools.
Step 4: Test the Chain
Once the chain is reassembled, it’s time to test it out. Spin the pedals and shift through the gears to ensure the chain is running smoothly. If you notice any skipping or grinding, double-check the link installation or chain tension. I always do a quick test ride around the block after repairs to ensure everything is working as it should.
Step 5: Lubricate the Chain
To keep your chain running smoothly and to prevent further damage, apply a light coat of lubricant to the chain. Wipe off any excess to avoid attracting dirt. I’ve found that lubricating my chain after every ride helps extend its lifespan and keeps it functioning at its best.
My First Bike Chain Repair Story
My first experience with fixing a bike chain happened on a beautiful autumn afternoon. I was cycling through a park when, suddenly, I heard the unmistakable sound of a snapped chain. I was miles away from home and didn’t have the tools I needed. I spent the next hour walking my bike back, feeling frustrated. From that day on, I made sure to always carry a small toolkit with a chain tool, quick links, and lubricant. Since then, I’ve been able to handle chain issues quickly and get back to enjoying my rides without any hassle.
Preventing Bike Chain Problems
As with any bike component, prevention is key to avoiding frequent chain issues. Regular cleaning, lubrication, and timely replacement of worn-out chains can save you from bigger headaches down the road. I always keep an eye on my chain for signs of wear, and when it starts to look stretched or damaged, I replace it before it becomes a bigger problem.