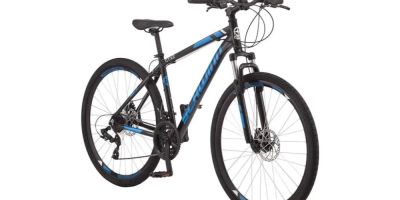
Mastering Brake Adjustments on Your Mountain Bike
As an avid mountain biker, I can tell you that nothing compares to the thrill of navigating rugged trails and conquering challenging terrains. But, there's one crucial component of my bike that I’ve learned to never overlook: the brakes. Properly adjusted brakes are essential for both performance and safety, and when you're speeding down a mountain or handling tight turns, you need to know that your brakes will work effectively. Over the years, I’ve adjusted my mountain bike brakes multiple times, and now, I’m ready to share my step-by-step guide on how to adjust your mountain bike brakes like a pro.
Conte's Bike Shop
3449 Wilson Blvd, Arlington, VA 22201, USA
1. Understanding the Types of Brakes on Your Mountain Bike
Before diving into the specifics of brake adjustments, it's important to understand the type of brake system you’re working with. Mountain bikes typically come with two main types of brake systems: rim brakes and disc brakes. While both serve the same basic function, the way they operate and the adjustments they require differ significantly.
Rim Brakes: Rim brakes work by using brake pads that clamp down on the wheel's rim to slow it down. These brakes are lighter and easier to adjust, but they can wear out faster, especially if you're riding in muddy or wet conditions.
Disc Brakes: Disc brakes are more powerful and provide better performance, especially in wet or muddy conditions. These brakes use a rotor attached to the wheel hub and a caliper to slow the wheel down. There are two types of disc brakes: mechanical and hydraulic, with hydraulic brakes offering more precise control and less maintenance.
Bicycle Barn LLC
839 Reading Rd, East Earl, PA 17519, USA
2. The Tools You’ll Need for the Job
Before starting the brake adjustment process, make sure you have the following tools at hand:
- Allen wrenches: These are essential for loosening and tightening bolts.
- Screwdrivers: Both flathead and Phillips screwdrivers will be useful for adjusting brake pads and settings.
- Brake pad spacers: These can be used to prevent damage to the brake system when making adjustments.
- Lubricant: For smooth operation of moving parts like the brake levers and calipers.
- Brake cleaner: This is especially important for cleaning disc brakes.
3. Adjusting Rim Brakes
Rim brakes are simpler to adjust, making them a good choice for beginners. Here's how to get your rim brakes in top shape:
3.1. Checking Brake Pads for Wear
The first step is inspecting the brake pads. Over time, the pads wear down and lose their ability to grip the rim effectively. If the pads are too thin or damaged, it's time to replace them. I always check the pad wear indicators, and if they’re close to or below the mark, I replace the pads to ensure optimal braking performance.
3.2. Adjusting the Brake Pads
When adjusting rim brakes, ensure that the brake pads are aligned properly with the rim. The pads should make contact with the rim’s braking surface squarely, not at an angle. If the pads are misaligned, you can use an Allen wrench to adjust their position. Make sure there’s a small gap between the brake pad and the rim when the brakes are not applied to avoid rubbing.
3.3. Fine-Tuning the Brake Levers
Next, you'll want to adjust the brake lever for comfort and efficiency. If the lever feels too loose or too tight, you can adjust the tension of the brake cables. Tightening the cable increases the pressure on the pads, while loosening it makes the brake action more gradual. I typically adjust the lever so it engages with enough force but without feeling too stiff under my fingers.
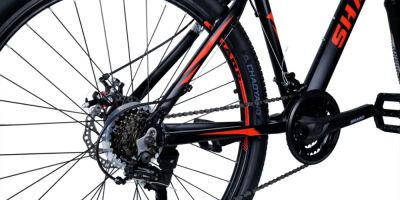
4. Adjusting Disc Brakes
Disc brakes are a bit more complex, but they provide superior performance in most mountain biking conditions. Here’s how to adjust them:
4.1. Checking the Brake Pads and Rotors
Just like with rim brakes, it’s important to regularly check the brake pads for wear. With disc brakes, the pads should be positioned properly to avoid rubbing against the rotor. Over time, the pads will wear down, and you may need to replace them. Additionally, I always check the rotor for warping or damage. A warped rotor can cause uneven braking and should be replaced immediately.
4.2. Aligning the Caliper
Disc brakes require precise alignment between the brake pads and the rotor. If you notice any rubbing or uneven braking, the caliper may be out of alignment. Start by loosening the caliper mounting bolts slightly so that it can move freely. Then, pull the brake lever to center the caliper over the rotor. Tighten the bolts while keeping the brake lever pulled. This ensures that the caliper stays centered, and the pads grip the rotor evenly.
4.3. Adjusting the Brake Lever and Pad Tension
For mechanical disc brakes, you can adjust the tension of the brake cables using the barrel adjusters. Turn the barrel adjuster clockwise to tighten the cable and increase brake engagement, or counterclockwise to loosen the cable for a more gradual response. Hydraulic disc brakes require less frequent adjustments, but it’s still important to ensure the lever feels responsive and that the brake pads engage at the right moment.
5. Troubleshooting Common Brake Problems
As with any bike component, there can be issues with your brakes that require attention. Here are some common brake problems I’ve encountered and how to fix them:
5.1. Squeaky Brakes
Squeaky brakes are a common problem, especially with disc brakes. The noise often comes from dirt or debris between the brake pads and rotor. To fix this, clean the rotors with a brake cleaner and use a rag to wipe off any dirt from the brake pads. If the squeaking persists, the pads may need to be replaced.
5.2. Brake Fade
Brake fade happens when the brakes lose their effectiveness after prolonged use, especially on long descents. This can be caused by overheating brake pads or fluid in hydraulic systems. To prevent brake fade, take breaks during long descents and allow your brakes to cool down. For hydraulic brakes, consider changing the brake fluid if it’s old or contaminated.
5.3. Weak Braking Power
If your brakes feel weak or unresponsive, the brake pads may be worn out or contaminated with oil. Check the condition of your pads and replace them if needed. For disc brakes, ensure that the rotors aren’t damaged or contaminated, and clean them thoroughly before use.
6. Regular Brake Maintenance Tips
Maintaining your mountain bike brakes is key to ensuring long-lasting performance. Here are a few maintenance tips I follow:
- Regularly clean your bike: Dirt and grime can affect brake performance, especially for disc brakes. Clean your bike after each ride, especially the brake pads and rotors.
- Inspect brake pads regularly: Check the wear on your brake pads every few rides to ensure they’re still in good condition. Replace them when they’ve worn down to the indicators.
- Keep cables lubricated: If you’re using rim brakes, make sure the brake cables are well-lubricated to prevent fraying and ensure smooth operation.
- Bleed hydraulic brakes as needed: For hydraulic disc brakes, you may need to bleed them occasionally to remove air bubbles in the brake line. This ensures consistent braking power.
Adjusting and maintaining your mountain bike brakes doesn’t need to be intimidating. With the right tools and knowledge, you can easily keep your brakes in top condition for safe and enjoyable rides. Happy biking!