Mastering the Art of Repairing a Punctured Mountain Bike Tire
As an avid mountain biker, I’ve had my fair share of punctured tires during my rides. Whether it’s a thorn, a sharp rock, or just an unlucky run-in with a piece of debris, flat tires are an inevitable part of cycling. I remember the first time I had to repair a punctured mountain bike tire on my own—it was a little intimidating, but I quickly learned the ropes. Over the years, I’ve become proficient at fixing punctures on the trail and at home, and I’m here to share everything I’ve learned with you. This guide will walk you through the process of repairing a punctured mountain bike tire, whether you’re at home in your garage or out on the trail with limited tools.
Conte's Bike Shop
3449 Wilson Blvd, Arlington, VA 22201, USA
1. The Basics: Understanding What You Need to Repair a Puncture
Before diving into the actual repair process, it’s important to gather the necessary tools and materials. When I first started, I made sure to keep a basic repair kit in my backpack, as this would allow me to handle most punctures while out riding. Here’s what you’ll need for a successful tire repair:
Bicycle Barn LLC
839 Reading Rd, East Earl, PA 17519, USA
1.1 Repair Kit
A good bike repair kit is essential for quick and effective fixes. The kit should include a patch or plug kit, a tire lever (or two), a small pump, and a valve core remover. For mountain bikes, make sure you have the right type of tire patches—either adhesive patches or rubber plugs, depending on the nature of the puncture.
1.2 Replacement Inner Tube (Optional)
If the puncture is too large to be patched, having a spare inner tube on hand is a lifesaver. I always carry a spare tube with me on long rides, as it’s often easier and faster to replace the tube than to patch it, especially when I’m in a hurry to get back on the trail.
1.3 Air Supply
Whether you use a hand pump or a CO2 inflator, it’s important to have a way to reinflate your tire after the repair. I personally prefer a small, portable hand pump that fits easily in my backpack. For a quicker option, I sometimes use a CO2 inflator to get back on the road or trail faster.
2. Step-by-Step Guide to Repairing Your Punctured Mountain Bike Tire
Now that you have everything you need, let’s walk through the process of repairing a punctured mountain bike tire. Don’t worry—it’s easier than it sounds, and with a little practice, you’ll be able to do it in no time. I’ve broken down the steps to make it as simple as possible, whether you’re at home or on the trail.
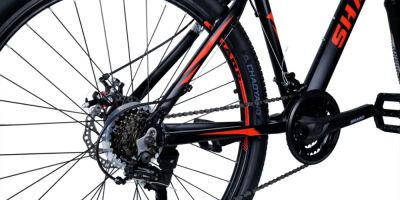
2.1 Step 1: Remove the Wheel
The first step is to remove the wheel from the bike. If the puncture is in the rear tire, shift the gears to the smallest chainring to make it easier to remove the wheel. If you’re on the trail, be sure to find a stable, clean spot to work on your bike. I always carry a multi-tool with me to make this process easier, as some mountain bikes may require you to remove the rear wheel using quick-release or bolts.
2.2 Step 2: Take Out the Inner Tube
Once the wheel is off, use a tire lever to pry the tire away from the rim. I typically start at one point of the tire and gently work my way around. For tough-to-remove tires, I use two tire levers—one to keep the tire off the rim and the other to continue loosening it. Once the tire is partially off, remove the inner tube carefully. If you’re on a trail, be sure to inspect the area where the puncture occurred, as you don’t want to end up with another flat from the same source.
2.3 Step 3: Find and Assess the Puncture
Next, locate the puncture by inspecting the inner tube. Sometimes it’s obvious, especially if you see a visible hole or tear. If you’re having trouble finding the puncture, inflate the tube slightly, submerge it in water, and look for bubbles. Once you’ve found the hole, mark it with a piece of chalk or a marker to make it easier to patch.
2.4 Step 4: Prepare the Patch
If you’re patching the inner tube, start by lightly sanding the area around the puncture. This helps the patch adhere better and ensures a longer-lasting fix. Apply the glue if necessary and wait for it to become tacky (usually a minute or two). Then, press the patch firmly over the hole, ensuring there are no air bubbles or gaps. Once the patch is applied, give it a few minutes to set before moving on.
2.5 Step 5: Reassemble the Tire and Tube
After the patch has been applied and set, it’s time to put everything back together. Start by inserting the patched inner tube back into the tire, making sure it’s properly aligned. Then, carefully push the tire back onto the rim, making sure not to pinch the inner tube. Use your tire levers to help seat the tire securely onto the rim. Be sure the tire is fully in place before moving on to the next step.
2.6 Step 6: Inflate the Tire
Once the tire is back in place, it’s time to inflate it. Slowly pump up the tire until it reaches the recommended pressure. Check the tire pressure on the sidewall to make sure you’re within the correct range. If you're on the trail and using a CO2 inflator, just make sure not to over-inflate the tire, as this can damage the inner tube.
2.7 Step 7: Reinstall the Wheel
After inflating the tire, reinstall the wheel on the bike. Double-check that the tire is properly aligned with the rim and that the brake pads aren’t rubbing against the tire. If you removed the rear wheel, make sure the chain is properly threaded through the derailleur and that everything is tight and secure. Once everything is back in place, give your bike a test ride to ensure everything feels right.
3. Pro Tips for Preventing Future Punctures
Now that you know how to repair a punctured mountain bike tire, you might be wondering how to avoid getting another flat. In my experience, there are a few things you can do to minimize the risk of future punctures:
3.1 Use Puncture-Resistant Tires
One of the best investments I made for reducing punctures was switching to puncture-resistant tires. Many tire manufacturers now offer models designed to resist thorns, sharp rocks, and other debris that could cause flats. These tires have an extra layer of protection between the tire and inner tube, which significantly reduces the risk of punctures.
3.2 Maintain Proper Tire Pressure
Riding with under-inflated tires is one of the most common causes of punctures, as it increases the chances of pinch flats. I always make it a habit to check my tire pressure regularly and ensure that it’s within the recommended range for my bike. A good quality floor pump with a pressure gauge is a must-have tool for every rider.
3.3 Keep Your Bike Clean and Inspected
Keeping your bike clean and inspecting it regularly can help you avoid punctures and other issues. After every ride, I make sure to check my tires for debris or sharp objects that could cause a puncture. A quick inspection can save you from a lot of hassle down the road.
Repairing a punctured mountain bike tire might seem intimidating at first, but with a little practice, it becomes second nature. The key is to stay prepared with the right tools and take the time to do the repair properly. Whether you're at home or on the trail, knowing how to fix a flat tire will ensure you're never stuck for too long. If you're looking for more tips, tools, or bike gear, be sure to check out Healthy Cycling for the best recommendations on cycling products and services!