- 1-Why-Replace-Your-Bike-Chain
- 2-Tools-Needed-for-Bike-Chain-Replacement
- 3-Step-by-Step-Process-to-Replace-Your-Bike-Chain
- 4-Tips-for-Maintaining-Your-New-Bike-Chain
- 5-How-Healthy-Cycling-Can-Help-with-Bike-Chain-Replacement
Why Replace Your Bike Chain
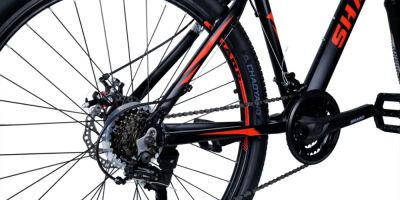
Understanding when and why to replace your bike’s chain is crucial for maintaining smooth and safe rides. Over time, chains stretch and wear down due to regular use, dirt, and lack of lubrication. A worn chain can lead to poor shifting performance, increased wear on gears, and even sudden chain breaks during rides.
Many cyclists underestimate the importance of timely chain replacement, but delaying this maintenance can result in costly repairs to other drivetrain components. Typically, chains need replacement after 2,000 to 3,000 miles depending on conditions. Paying attention to performance signs such as slipping gears or noisy pedaling can indicate when it’s time to change your chain.
Tools Needed for Bike Chain Replacement
Replacing your bike’s chain requires a few essential tools, many of which are affordable and easy to use. The basic toolkit includes a chain breaker or chain tool to remove the old chain, a new compatible bike chain, and optionally a chain wear indicator tool to measure chain stretch.
Other helpful tools include a set of master links if your chain uses them, pliers for installing these links, and degreaser or lubricant to clean and maintain the drivetrain during the process. Having these ready before starting will make the replacement straightforward and efficient.
Step-by-Step Process to Replace Your Bike Chain
Replacing your bike’s chain might seem daunting at first, but following these detailed steps can simplify the process significantly.
- Prepare Your Workspace: Set your bike on a stand or lean it securely to access the drivetrain easily.
- Remove the Old Chain: Use the chain breaker tool to push out a pin and break the old chain, then carefully remove it from the gears.
- Measure and Size the New Chain: Lay the new chain alongside the old one to match the length. Remove extra links if necessary with the chain tool.
- Install the New Chain: Thread the new chain through the front derailleur, around the cassette, and through the rear derailleur pulleys.
- Connect the Chain: Use a master link or chain pin to join the ends securely. Ensure the connection is tight and the chain moves freely.
- Lubricate and Test: Apply lubricant to the chain, wipe off excess, then shift through all gears to test smoothness.
With patience and care, this process can be completed at home, saving time and repair costs.
Tips for Maintaining Your New Bike Chain
After replacing your bike’s chain, proper maintenance will extend its life and optimize performance. Regularly clean the chain using a degreaser to remove grime and old lubricant. Apply a suitable bike chain lubricant frequently, especially after riding in wet or dusty conditions.
Also, periodically check for chain stretch with a wear indicator tool to catch early signs of wear before they affect other components. Keeping the drivetrain clean and well-lubricated not only protects your investment but also enhances your riding experience with smoother gear shifts.
How Healthy Cycling Can Help with Bike Chain Replacement
For cyclists looking to replace their bike’s chain or seeking expert advice on bike maintenance, Healthy Cycling offers a wide range of products, detailed guides, and professional recommendations. Whether you need the right tools, quality chains, or tips on care, Healthy Cycling is your trusted partner.
Our platform helps you find the best chains compatible with your bike, ensures you have access to reliable tools, and connects you with knowledgeable service providers if you prefer professional installation. Visit Healthy Cycling to make your bike chain replacement easy, affordable, and effective.